Friday, March 29, 2013

Make a 'good luck' horse shoe to hang above your door

{We've moved! Visit us at our new and improved blog at: Texas Craft House}

Hi,

Today I have a very simple, inexpensive craft to share with you. My mom has been saving me old horse shoes from her own horses to use for crafting. I used extra materials I had around the craft room so it didn't cost me anything to make. :)  I used marbles, twine, beads and scrap fabric.


To continue reading click here...

Friday, March 15, 2013

DIY Easter Wreath

{We've moved! Visit us at our new and improved blog at: Texas Craft House}


Happy Friday,

As you know I have been obsessed with wreaths lately. I loved my St. Patrick's Day Wreath I did not too long ago but it's already time to put up an Easter one.

I purchased a twig wreath at Hobby Lobby for $4.99 and used a 40% off coupon via their store app.


 I also used Spanish moss. I had PLENTY moss left over from my moss ball craft so I didn't have to buy any.


I bought a pack of Easter eggs. They had lots of colors and sizes to choose from. At Hobby Lobby all of the Easter crafts were 50% off. :) This bag was only .50!


To start, squeeze hot glue onto the wreath in small sections.


 Then top with moss. I had to use scissors to cut apart sections of moss so it was easier to work with. 


I just went around the front, I didn't worry about covering the back.


Then I cut twine into 3 strips.


 And hot glued the tips to the top of the eggs. Make sure these are completely dry before working with them.


Next I hot glued the strings, at different lengths, to the back of the wreath. If I had any extra string hanging off I just cut it. Again, make sure it is completely dry before moving the wreath around.


Then I had some extra burlap ribbon. It was really wide so I cut it in half.


Then I tied it into a bow. I used the same method as tying a shoe. :)


 And here is the finished wreath!


I like that it is really simple.


Here is another variation.


I love it!


You could add more eggs to the middle, of different sizes, too. Or you could change up the color of the bow by getting a different ribbon. I thought about wrapping more burlap along the outside of the wreath, too. Lots of different ways you could play with this wreath or add to it. :)

I hope you enjoyed!

Check back for more creativity soon,
Cassie

Thursday, March 14, 2013

Repurpose a magnetic calendar into a memo board

{We've moved! Visit us at our new and improved blog at: Texas Craft House}

Good morning,

My sister, Cally, came over yesterday and we spent the day shopping at antique stores and thrifting in our area. We found some great deals and picked up lots of things to craft with. While at Goodwill Cally found an old, ugly magnetic calendar that was beat up and gray. She had the great idea of turning it into a memo board by covering it in some cute fabric and adding magnets. I am very excited to show you what the end result was!

Here is the original board. It was $3.50 at the thrift store.

While at Hobby Lobby Cally chose some cute fabric. She bought 5/8 a yard worth of fabric but really only 
needed 1/2 a yard. She used her 40% off coupon to get it even cheaper, too!


Then we laid out the fabric and wrapped around the front of the calendar. We taped it to the back first, this way we were able to adjust the fabric and make sure it was straight before gluing it.


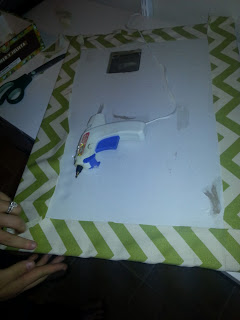
Then we used hot glue to secure it to the calendar. We had to trim some of the fabric off the corners to get it tucked and glued tightly. 


 Here is the board wrapped. We ironed it after this point, I suggest ironing it before beginning... we just forgot. :)


Next Cally wanted to make some magnets. Here are our materials: Mod podge, old book pages, foam brush, large marbles, and magnets.


First we traced the marbles onto the book page. Cally tried to find cute words or sayings to trace over.


Then cut out your traced circles. Cut then a little smaller than your line so that the pages aren't sticking out around your marble.


Next, apply Mod Podge to the bottom of your magnet, place the book page circle on the glue, then glue again with a light layer along the bottom. The glue looks white but it dries clear so no worries!


When the glue has dried apply a hot clue to the book page marble and attach the magnet.


Here are the finished magnets. We used the same old book used in the post about painting on old book pages. :) Glad I found this book for $1.50 it has come in handy!


And here is the completed project! It turned out so nice!


And the before and after. WOW!


We see these old magnet calendars at thrift stores and Goodwill all the time. We also see cork boards which be a cute similar project. You could change up the fabric and play around with the magnets by using different scrapbook pages. 

Have you repurposed an used items recently?

Check back for more creativity soon!
Cassie


Wednesday, March 13, 2013

Using a pegboard to organize your closet

{We've moved! Visit us at our new and improved blog at: Texas Craft House}

Good morning,

Last night my husband helped me put up my new towel rack. I love it! Instead of using a towel bar... which let's face it can be a pain and ours was always falling down. Finally I found one I liked at Home Depot for $19.99. Now we can just throw up our towels and go.


I also got a matching hook for beside the shower to put up my robe and hair turbine.


After making these small, easy, improvements to the bathroom it got me motivated to work on the closet. When we first moved into our home the previous homeowners had two peg boards on the back wall behind the door. They took all the pegs with them so I finally purchased a box of various pegs for around $10.00 and went to town.

I am so happy with the pegboard and am so mad at myself that I had never thought about/found out about this idea before. It is GENIUS! When it comes to organizing and decluttering your closet it is a BIG help!

Here is a picture of the finished product.


There is space now for ties and belts...


Winter scarves and summer scarves...


Coin purses and wristlets....


Baseball caps (my husband has a million and they were always getting in the way! Not anymore =) )...


Bracelets, earrings, necklaces... 
I don't have the best collection. I was ALWAYS loosing my jewelry, I don't see that happening now. :)


Best of all... look at all this empty space that I have left over for future items! :) I didn't even have enough things to fill the pegboards yet. Love it!


Here is the final picture. Clean, off the ground, out of baskets or tubs, ORGANIZED!


The previous homeowners had bought two peg boards. I just looked on the Home Depot website and they are $17.74 each board. We have a fairly large back wall so you might only need one. The box of pegs I bought were around $10.00 and they had all kinds of pegs (large, small, long, short).

Hope this helps you with your closet as it did with ours!

Check back for more creativity soon,
Cassie

Tuesday, March 12, 2013

DIY painting on old book pages

{We've moved! Visit us at our new and improved blog at: Texas Craft House}

Have you seen the old book page art floating around on pinterest? I finally decided to give it a try and now I am addicted to painting on old book pages! It has so much character and could go in any home. The best part about it... the simpler the painting/art the better it can look.