
Sunday, May 24, 2015
Texas Burlap Door Hanger
I have been pinning all kinds of burlap door hangers onto my wreaths pinterest board. They seem to be everywhere… on Etsy, in craft booths… This weekend I tried making one myself and was so surprised at how easy they were. I can’t wait to show you.


Monday, March 9, 2015
Easy Washi Tape Crafts
Washi tape, or small craft tape, has been really popular these past couple years. I've never bought any and never really knew what to do with it. I've always loved all the looks and designs - there are so many options! Even duct tape is starting to sell a small decorative version.
Here are some simple crafts using this craft tape to add some personality to every day items.

To Continue Reading Click Here...

To Continue Reading Click Here...
Friday, January 23, 2015
Refinished Antique Mirrors
{We've moved! Visit us at our new and improved blog at: Texas Craft House}
Check out our new blog and see this simple way to refinish detailed antique mirrors with just spray paint.

To Continue Reading Click Here...
Friday, January 2, 2015
We've moved!!
Please check us out at TexasCraftHouse.com
If you like us follow us on facebook and Twitter!

Happy New Year!
<3 Elisabeth and Cassie
Monday, December 29, 2014
DIY Pebble Art
{We've moved! Visit us at our new and improved blog at: Texas Craft House}
Elisabeth and I recently went on our annual Broken Bow trip in Oklahoma with our husbands. We cook, we play, we laugh, we craft ... We have so much fun. Every year we make some type of craft while there. This year we just brought our glue guns and some thick paper and used rocks and pebbles we found on our cabin site.
Wait until you see what all we came up with!

To continue reading click here...
Elisabeth and I recently went on our annual Broken Bow trip in Oklahoma with our husbands. We cook, we play, we laugh, we craft ... We have so much fun. Every year we make some type of craft while there. This year we just brought our glue guns and some thick paper and used rocks and pebbles we found on our cabin site.
Wait until you see what all we came up with!
To continue reading click here...
Sunday, August 31, 2014
Menu board
{We've moved! Visit us at our new and improved blog at: Texas Craft House}
This craft uses a galvanized metal sheet and circuit vinyl to make a menu board. I love the look of it and how easy it us to use with an expo marker. We attached it with double sided tape (duck tape brand)... but if you are wanting to take the board on and off I suggest attaching magnets to the back instead.

Sunday, July 6, 2014
Closet Space Saver
{We've moved! Visit us at our new and improved blog at: Texas Craft House}
Every year I try to tackle spaces in my house that are not organized and for some reason the new year always sparks my need to clean. Check out our new blog to see how I tackled closet clutter in my master closet!

To continue reading click here...
Friday, July 4, 2014
Red, White and Blue Trifle
{We've moved! Visit us add our new and improved blog at: Texas Craft House}
Hi!!
I wanted to share my favorite dessert for the summer and of course Memorial Day and Fourth of July!

To Continue Reading Click Here...
Hi!!
I wanted to share my favorite dessert for the summer and of course Memorial Day and Fourth of July!

To Continue Reading Click Here...
Monday, June 30, 2014
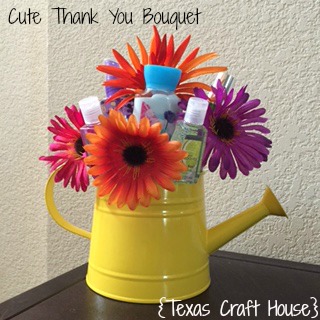
Cute Thank You Gift Bouquet
{We've moved! Visit us at our new and improved blog at: Texas Craft House}
Hi Everyone!! Were you looking for a more girly version of our Man Bouquet? A friend recently made me this cute gift bouquet as a thank you and I had to share it!!

To Continue Reading Click Here...
Hi Everyone!! Were you looking for a more girly version of our Man Bouquet? A friend recently made me this cute gift bouquet as a thank you and I had to share it!!
To Continue Reading Click Here...
Sunday, June 15, 2014
Gender Reveal!
{We've moved! Visit us at our new and improved blog at: Texas Craft House}
I'm so excited to share my friend's gender reveal from this weekend!!! Here's the cute backstory: her hubby is a firefighter and proposed to her with a big banner on a fire truck so this genius gender reveal shouldn't surprise you!
 Happy Crafting!!
I'm so excited to share my friend's gender reveal from this weekend!!! Here's the cute backstory: her hubby is a firefighter and proposed to her with a big banner on a fire truck so this genius gender reveal shouldn't surprise you!
<3 Elisabeth
Friday, June 13, 2014
DIY Money Lei
{We've moved! Visit us at our new and improved blog at: Texas Craft House}
Hi!!
 The concept behind making the pinwheels is super easy, just a little bit tedious. I followed the step by step instructions from the site and enlisted the help of a few people to fold the bills while I glued. The white pinwheels turned out great and were very sturdy with the hot glue, the bills however did not want to stay together with the glue dots, I'm not sure what medium would have been better to keep it all together. I still love how it turned out and just how happy the grad is with his lei!

Hi!!
In the spirit of graduation I wanted to share this money lei I made for my hubby's cousin. I wasn't sure what to get him, but thought a gift card just wasn't enough. I found this money lei idea on Pinterest and used the directions from here only with less bills and papers.
Supplies:
$20 in ones
White computer paper (20 cut to bill size)
Glue dots
Ribbon
Hot glue gun
Happy Crafting!!
<3 Elisabeth
DIY Graduation Caps
{We've moved! Visit us at our new and improved blog at: Texas Craft House}
Hi everyone!!
Hi everyone!!
My sister graduated from high school last year and asked for my help to decorate her cap! She is going to school for nursing and wanted to use that theme. She came to me with a cute idea that she had found on Pinterest where a stethoscope is shaped like a heart.


Friday, May 30, 2014
DIY Destination Wedding Guide for Guests
{We've moved! Visit us at our new and improved blog at: Texas Craft House}
Hi!
I'm sharing how I did my itinerary for my Destination Wedding Welcome Bags! I found the brag books, small photo albums, at Michaels for only $1.99, with some coupons and a little bit of running around to several different Michaels stores I got 20 perfect brag books for a good price! Fun fact: The starfish on the cover of the brag book is the same kind that I had for my wedding hair clip, which I ordered here! :)

To Continue Reading Click Here...

To Continue Reading Click Here...
Saturday, May 17, 2014
Initial door hanger wreath
{We've moved! Visit us at our new and improved blog at: Texas Craft House}
Last night my husband and I went to Main Street Days in Grapevine, Texas. We had a blast eating, sipping, listening to good music and shopping the vendor booths.
We found one booth with unfinished wood. The gentleman was selling initials, symbols, sayings, crosses, anything and everything. We bought an S for our last name for around $15. I thought this was a steal considering the size. We also bought a Harley Davidson cut out. Not sure what I'm going to do with it yet, but I'll have all summer to decide.
I painted my S with blue acrylic paint that I already had. Then I hot glued a big yellow sunflower to the edge. I wanted something that would really stand out from the street and would make me think of summer. I love the contrasting blue and yellow. :-) Also like something from the usual wreath.
Have a great weekend and check back for more creativity soon!
Cassie


Sunday, May 4, 2014
DIY Curtain Rod Wall Decor with Hanging Frames
{We've moved! Visit us at our new and improved blog at: Texas Craft House}

I have to admit that I am the most proud of this refresh that I've done to my living room wall! I used to have floating shelves with my knick knacks on them and wasn't in love with that look anymore. I had a curtain rod left over from our move a few years ago and I didn't toss it thinking I could do something with it. I'd seen an idea of several frames hanging from a rod and wanted to figure out how to do this. I went back and forth considering ideas and shooting them down because of the sheer weight frames would have on the rod. Like I said years passed and this idea had been gnawing at me, so I started googling different strings of words to try to get more inspiration on how to accomplish my idea. I came across Rodworks.com and they literally have step-by-step directions for "fake hanging," check out the link to see! What is this you ask? Let me show you!!
To continue reading click here...

I have to admit that I am the most proud of this refresh that I've done to my living room wall! I used to have floating shelves with my knick knacks on them and wasn't in love with that look anymore. I had a curtain rod left over from our move a few years ago and I didn't toss it thinking I could do something with it. I'd seen an idea of several frames hanging from a rod and wanted to figure out how to do this. I went back and forth considering ideas and shooting them down because of the sheer weight frames would have on the rod. Like I said years passed and this idea had been gnawing at me, so I started googling different strings of words to try to get more inspiration on how to accomplish my idea. I came across Rodworks.com and they literally have step-by-step directions for "fake hanging," check out the link to see! What is this you ask? Let me show you!!
To continue reading click here...
Tuesday, April 22, 2014
DIY baseball hat
{We've moved! Visit us at our new and improved blog at: Texas Craft House}
Tomorrow my kindergarten class has a field trip. Most of the day is going to be outside and it's suppose to be upper 80s for temperatures. I wanted something so my face wouldn't burn, but also cute and representative of my school.
I found a standard trucker/baseball hat for $3.30 to match my school colors and a white paint pen for letters. I also used a piece of chalk from my craft room to practice my letters/spacing and to trace over with my paint pen.
I think it turned out cute. In the bottom corner I put my school initials and kinder for kibdergarten. This hat had a strap in back instead of those little snapping buttons so I also wrote my last name. I used a paper towel as support when writing. When the paint dries I'll just use a wet napkin to wipe away the chalk.
I plan on using this hat on future field trips and even field day coming up. It was easy to do and the chalking before helped me because I could practice and erase my mistakes if needed.
Check back for more creativity soon!
Cassie
Cassie


Sunday, April 20, 2014
DIY Baseball Nail Art
{We've moved! Visit us at our new and improved blog at: Texas Craft House}
Hi!
It's Rangers season here in Texas. Elisabeth and I love going to the games and sporting our fan gear.
My sister and I went to get manicures and I wanted baseball nails. The nail salon was packed! Instead we went and bought some nail polish and did it ourselves. I used Essie nail colors along with a base coat and a top coat. I did the baseball stitches with a red permanent marker. It was so simple, the Sharpe made it effortless and easy to do. I love how they turned out.
I cant wait to think up more nail art ideas... the marker is the way to go! Have you seen Aztec nail art? That might be my next project... maybe on an accent nail only.
Have a Happy Easter! Go Rangers!
Check back for more creativity!
Cassie
Cassie


Wednesday, November 27, 2013
Easy red poinsettia wreath
{We've moved! Visit us at our new and improved blog at: Texas Craft House}
Good morning!
I was looking around on pinterest for Christmas mantel ideas and I kept seeing that everyone would put wreath's above their fireplace. Most of them had it attached to a mirror. I already had a mirror and thought I would add a wreath. I decided immediately that I wanted a bold red wreath... what better to do then a poinsettia one?
I started with a basic wreath form. Mine is 18 inches. I used the twig one with the dried leaves (watch out it crumbles everywhere and can make a mess :) ). I also bought 3 bunches of poinsettia flowers, which were 50% off. On each flower bunch was about 10 flowers. I also grabbed my hot glue gun but actually didn't even end up using it.

Start by cutting off all of the flowers.

Then just start poking them right into the wreath. The twigs in my wreath were pretty tight and my poinsettias stayed in place so I didn't use the hot glue gun. I figured that would be fine since this was going to be an inside wreath.

That's it!

I used a command clip to attach it to my mirror.

I love the pop of red!
I'm not quite finished with my mantel yet. I am working on homemade stocking holders (post to come soon!) to add. :) Have I mentioned I LOVE Christmas crafts?
Like the green burlap trees? Here is my post from earlier in the week with the tutorial - DIY Christmas tree craft.
Check back for more creativity soon!
Cassie
Good morning!
I was looking around on pinterest for Christmas mantel ideas and I kept seeing that everyone would put wreath's above their fireplace. Most of them had it attached to a mirror. I already had a mirror and thought I would add a wreath. I decided immediately that I wanted a bold red wreath... what better to do then a poinsettia one?
I started with a basic wreath form. Mine is 18 inches. I used the twig one with the dried leaves (watch out it crumbles everywhere and can make a mess :) ). I also bought 3 bunches of poinsettia flowers, which were 50% off. On each flower bunch was about 10 flowers. I also grabbed my hot glue gun but actually didn't even end up using it.

Start by cutting off all of the flowers.

Then just start poking them right into the wreath. The twigs in my wreath were pretty tight and my poinsettias stayed in place so I didn't use the hot glue gun. I figured that would be fine since this was going to be an inside wreath.

That's it!

I used a command clip to attach it to my mirror.

I love the pop of red!
I'm not quite finished with my mantel yet. I am working on homemade stocking holders (post to come soon!) to add. :) Have I mentioned I LOVE Christmas crafts?
Like the green burlap trees? Here is my post from earlier in the week with the tutorial - DIY Christmas tree craft.
Check back for more creativity soon!
Cassie
Sunday, November 24, 2013
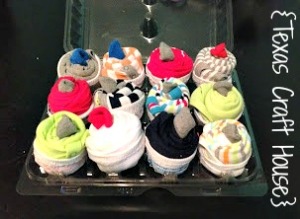
DIY Cupcake Onsies
{We've moved! Visit us at our new and improved blog at: Texas Craft House}
A couple of coworkers recently had a baby and several of us wanted to get something to congratulate them on their babies. One of my girlfriends saw the cutest idea to turn onsies into cupcakes here. We went to Target and bought their Circo brand onsies, which were on Target Cartwheel for an additional 20% off savings! We ended up with 12 onsies and 12 pairs of socks for the gift.
To Continue Reading Click Here...
A couple of coworkers recently had a baby and several of us wanted to get something to congratulate them on their babies. One of my girlfriends saw the cutest idea to turn onsies into cupcakes here. We went to Target and bought their Circo brand onsies, which were on Target Cartwheel for an additional 20% off savings! We ended up with 12 onsies and 12 pairs of socks for the gift.

To Continue Reading Click Here...
DIY Lantern Light
{We've moved! Visit us at our new and improved blog at: Texas Craft House}
I love the beach! So I decorated one of my spare bedrooms in a beach theme and I had the hardest time finding the right light for the bedside. Granted today the beach theme is very popular and there are very cute light options out there now that I would have purchased had the options been available. Since things weren't available, I decided that I wanted to make my own light after finding the Morkt Lantern at IKEA that perfectly matched the color scheme in the room.

To Continue Reading Click Here...
I love the beach! So I decorated one of my spare bedrooms in a beach theme and I had the hardest time finding the right light for the bedside. Granted today the beach theme is very popular and there are very cute light options out there now that I would have purchased had the options been available. Since things weren't available, I decided that I wanted to make my own light after finding the Morkt Lantern at IKEA that perfectly matched the color scheme in the room.

To Continue Reading Click Here...
Subscribe to:
Posts (Atom)